Friday, December 29, 2017

Take the Indirect Route


Named Ranges can be a terrific boon to the efficiency and ease-of-use of your Excel workbooks. Although using named ranges is one of my favorite Best Practices, curious problems may arise when referring to these effective shortcuts. To obtain true mastery in this regard, however, the savvy Excel Guru can employ the humble Indirect Function! 

Used in its simplest form, the Indirect Function can simply take the Name in the cell it is referencing and return the Named Range that it refers to. Using the Indirect Function along with drop-down boxes created with Validation, is a very user-friendly way of making Interactive Reports.


Create a Spreadsheet Like the One Shown Above, and then: 

 1) Create your Named Ranges by selecting each of your ranges and typing the new Name in the Name Box on the upper-left corner of your worksheet. In the above example graphic, Name each of the monthly rows for the Units shown. For instance, for December, select C15:G15 and name it December (no sense in making this any more difficult than that…).

2) In cell D18 insert the formula “=SUM(INDIRECT(C18))”. The Indirect Function reads the name of the month you choose with the drop-down box in C18 and the formula sums up the total for the units.

Using the Indirect Function along with Validation it is just one example of how to use this powerful tool in Excel. I wish you all a very Happy and Successful New Year

Wednesday, December 20, 2017

Funnel Charts (not cakes…)


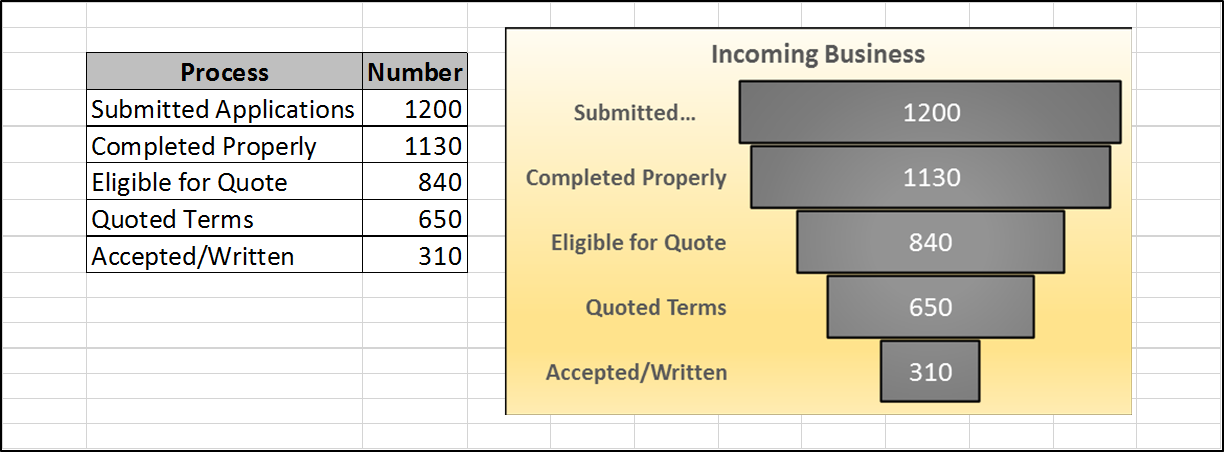
Funnel Charts, (Not to be confused with Funnel Cakes, which are something completely different…), are one of the newer features in Excel that deserve a closer look. This new chart that appeared in Excel for the first time last year, is excellent for illustrating processes that incrementally become more focused as each stage is completed. Since I have extensive experience in the insurance industry, I am showing how business “Funnels” into an insurance company. 

You will have to have the latest version of Excel, of course, but it is a good idea to frequently update anyway…
With reference to the Funnel Chart above, here are the Simple Steps:
1.    As in the illustration (which you may have to enlarge for best viewing), use one column for the Process steps and the other for the Amounts
2.    Select the Data in the simple table you have created
3.    Click Insert > Recommended Charts > Funnel
4.    Format according to your tastes and/or your audience

The result is a remarkably easy-to-understand (which should be a major goal of Any chart…) illustration of how your processes interrelate. This new chart will be, I am quite sure, very useful for many of us in the future. Funnel Charts – Another way to picture your data and enhance your business communication!

Thursday, December 14, 2017

Formatting Shortcuts Revisited

Yes, it’s true. I am an enormous fan of Keyboard Shortcuts. As every true Excel Guru will tell you, these shortcuts can save you many hours of work time over the long haul, and enhance your image as one of the Cool Kids in School.

One set of keyboard shortcuts that is typically overlooked is the ability to pull up the Right-Click menu to Change the Number Format in the cell or range of cells you are working on. Most all of us know that Right-clicking with your mouse and pulling up a context-sensitive menu is a good solution, but using the keyboard is Even Faster (and Cooler)!

The Right-Click Keyboard Shortcuts all start with “Ctrl+Shift”, which makes them more effortless to remember. As we discussed 4 years ago, the following are the most Commonly Used Tricks for rapid number formatting:

1.   General = Ctrl+Shift+~

2.   Number = = Ctrl+Shift+!

3.   Time = Ctrl+Shift+@

4.   Date = Ctrl+Shift+#

5.   Currency = Ctrl+Shift+$

6.   Percentage = Ctrl+Shift+%

It will, of course, take a little bit of time to become fully accustomed to using these shortcuts, but the time invested will certainly be worth it. Mastering keyboard shortcuts is an excellent way to maximize your Excel time (and make you appear the Brilliant Soul you truly are…).

Tuesday, December 5, 2017

Special Naming Ranges Tricks

As we have discussed in this blog, and most of us know quite well, Naming Ranges is a well agreed-upon Best Practice.

As with any tool within Excel, however, if you dig into it a little bit deeper you’ll find there are additional tips and tricks that can add to your knowledge and help you do even more in less time. Take for instance the following Two Tricks for Naming Ranges:

1.   Limiting the Scope of a Name
If you wish to reuse a Name on different worksheets within a workbook, you can limit the scope of a single use of the name to a single worksheet:
a.    Choose FORMULAS, and then click Define Name
b.   Fill in the details, specify SCOPE, and click OK

2.   Defining a Constant or Formula for a Name
The ability to have a Constant or Formula available in Name form can be a true timesaver when working with complex workbooks:
a.    Choose FORMULAS, and then click Define Name
b.   Type the NAME, SCOPE, and (if you wish, COMMENT)
c.    In the dialog box, REFERS TO, insert the Constant or Formula preceded by an =, and click OK

Knowing several Best Practices is the hallmark of any true Excel Guru. However, knowing a few extra special tricks in addition to these best practices can get you a place higher on the mountain.

Thursday, November 30, 2017

More Rounding…

Last week we discussed the use of the CEILING and FLOOR rounding functions. Those are, of course, Not All that is available when it comes to controlling your Precision in Excel. We will look at the INT, EVEN, and ODD functions.

=INT(number)
This function rounds the number down to the nearest integer. Many possible applications, including staffing of projects.

=Even(number)
Using this function, your number rounds away from zero to the nearest even integer. If your staffing requires pairs of individuals working together, this may be just your ticket.

=ODD(number)
As you might expect, this function always rounds away from zero to the nearest odd integer. Undoubtedly useful in certain Odd situations (sorry, I couldn’t resist…).

INT, EVEN, and ODD. More ways to round your data your way in Excel.

Wednesday, November 22, 2017

Ceiling & Floor

When Excel is displaying slightly different values than what is actually stored in the cells that you are working on, it can be beneficial to use one of the several Rounding functions. Two of these rounding functions are CEILING and FLOOR.

The use of a rounding function is often recommended, especially if the numbers you are investigating are the result of multiple mathematical calculations. Multiple calculations may, of course, result in the introduction of rounding errors. These behind-the-scenes errors can cause small inaccuracies which may be very significant when precision is necessary.

The syntax for CEILING is CEILING(Number, Significance) where
·         Number is the number being rounded, and
·         Significance is the number of additional integers to which the number is being rounded.

The following Examples make this a bit clearer:
·         = CEILING(20.3, 1) = 21
·         = CEILING(20.3, 5) = 25
·         = CEILING(-19.9, 2) = -18

The FLOOR function does the very same thing as the CEILING function; however it always rounds down.

CEILING and FLOOR. Two more very useful functions for your Excel toolbelt.

Friday, November 17, 2017

Time Management with Excel

I admit that I have been a bit overwhelmed with work lately, and as an instructor and avid proponent of Time Management, I find this slightly upsetting. If, in fact, you employ good time management techniques, you can very directly determine what you should be working on and when. By the way, Ready for Anything by David Allen is an excellent book on this subject.

But how can Excel help in this regard? Well, let’s say that you have your Calendar and To-Do Lists in PDF form. You can import data in this formant directly into an Excel spreadsheet using a PDF to Excel Converter. The result is that you to easily keep track of key dates or to-do lists. You can eliminate a plethora of reminder notes and other calendars. In the process, you’ll also save paper and time, (Time Management, get it?...)

A large project with several professionals collaborating can use this Excel spreadsheet as a database for Project Management. Share the spreadsheet, and everyone can add their own information. You can include data such as availability, contact info, element ideas, resource tools, and so forth. For starters, check out the many If you are organized, you won’t be sitting at your desk wondering what to do next and, that my friends, is a very good thing.